binutils 설치
- instrumentation : afl-gcc

오류 관련
1. 설치한 binutils 테스트해보려는데 오류남
- binutils 재설치하니까 오류 발생 안함

실험
실험1. power scheduler 비교
- AFL은 power scheduler가 없음.
- AFL은 power scheduler를 옵션으로 지정해줄 수 있음.
- 가설: AFL++ power schedule로 rare을 줬을 때 같은 시간(24시간)동안 AFL(default)보다 coverage가 넓다.
- 방법
- AFL
- default schedule
- mutator option : default(deterministic + havoc)
- instrumentation option : afl-gcc
- (default) forkserver
- AFL++
- power schedule : -p rare
- mutator option : -D (enable deterministic 즉, havoc + deterministic)
- instrumentation option : afl-gcc
- (default) snapshot LKM -> export AFL_NO_SNAPSHOT=1 -> disable snapshot

- 과정
위의 옵션으로 수행하면 된다.
- AFL
- timeout 24h ./afl-fuzz -i ../../common/input/ -o default_output -- ../../binutils/binutils_afl_gcc/build/bin/objdump -x @@
- AFL++
- export AFL_NO_SNAPSHOT=1
- timeout 24h ./afl-fuzz -D -p rare -i ../../common/input/ -o rare_D_output -- ../../binutils/binutils_afl_gcc/build/bin/objdump -x @@
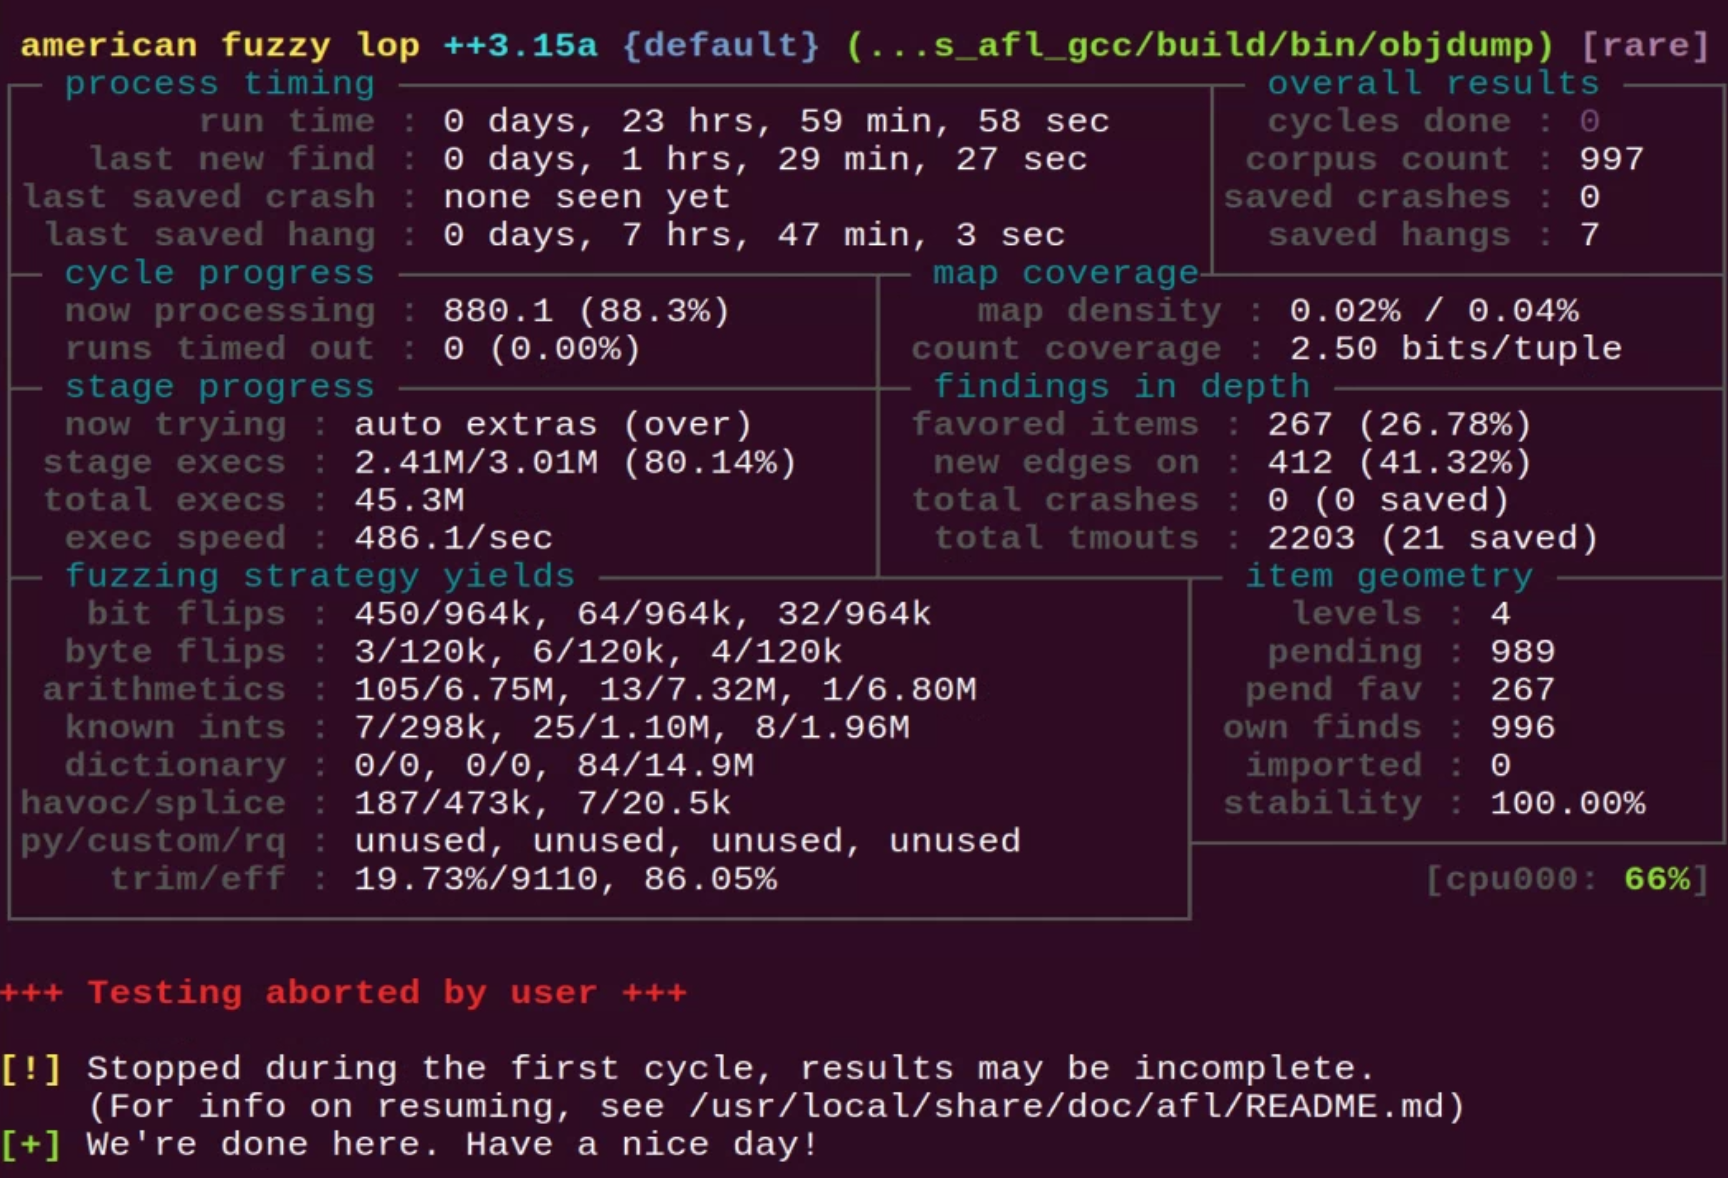
- 수행 화면
AFL


AFL++

- 결과
AFL coverage (by. lcov)

AFL++ coverage(by. lcov)

실험2. mutator 비교
- 가설 : AFL++에 MOpt mutator를 적용했을 때 같은 시간동안 AFL(default)보다 coverage가 넓다.
- 방법
- AFL
- default schedule
- mutator option : default(deterministic + havoc)
- instrumentation option : afl-gcc
- (default) forkserver
- AFL++

- power schedule : -p rare
- mutator option : -D (enable deterministic 즉, havoc + deterministic)/ -L -1 (MOpt)
- instrumentation option : afl-gcc
- (default) snapshot LKM -> export AFL_NO_SNAPSHOT=1 -> disable snapshot
- 과정
위의 옵션으로 수행한 결과 - 실험1의 결과
- AFL
- (실험 1과 동일) timeout 24h ./afl-fuzz -i ../../common/input/ -o default_output -- ../../binutils/binutils_afl_gcc/build/bin/objdump -x @@
- AFL++
- export AFL_NO_SNAPSHOT=1
- timeout 24h ./afl-fuzz -D -L -1 -p rare -i ../../common/input/ -o rare_D_L_output -- ../../binutils/binutils_afl_gcc/build/bin/objdump -x @@
- 수행 화면
AFL
-> 실험1과 동일
AFL++


- 결과
AFL++

실험3. forkserver, snapshot 비교
- 가설 : AFL++에 snapshot을 적용할 때가 forkserver를 사용할 때보다 성능이 좋다.
- 방법
- AFL++
- power schedule : default(fast)
- mutator option : -D (enable deterministic 즉, havoc + deterministic)
- instrumentation option : afl-gcc
- (default) snapshot LKM -> export AFL_NO_SNAPSHOT=1 -> disable snapshot
- 과정
export AFL_NO_SNAPSHOT=1(disable snapshot) 한 결과 - unset AFL_NO_SNAPSHOT 한 결과
- AFL++
- export AFL_NO_SNAPSHOT=1 (disable snapshot)
- timeout 24h ./afl-fuzz -D -p rare -i ../../common/input/ -o rare_D_output -- ../../binutils/binutils_afl_gcc/build/bin/objdump -x @@
- 실험 1의 AFL++와 같다.
- unset AFL_NO_SNAPSHOT
- timeout 24h ./afl-fuzz -D -p rare -i ../../common/input/ -o rare_D_withsnap_output -- ../../binutils/binutils_afl_gcc/build/bin/objdump -x @@
- 수행 화면
AFL++


- 결과
unset AFL_NO_SNAPSHOT AFL++

실험결과 종합
1. power schedule
| AFL | AFL++ rare&no snapshot (재실험; fast) | |
| Line Coverage(%) | 15.2 | 15.7 (15.8) |
| Function Coverage(%) | 30.5 | 30.5 (30.5) |
| Branch Coverage(%) | 11.6 | 12.1 (12.4) |
2. mutator
| AFL | AFL++ rare&Mopt&no snapshot (재실험; fast) | |
| Line Coverage(%) | 15.2 | 15.2 (15.7) |
| Function Coverage(%) | 30.5 | 30.5 (30.5) |
| Branch Coverage(%) | 11.6 | 11.5 (12.1) |
3. forkserver vs. snapshot
| AFL++ rare&no snapshot (재실험; fast) | AFL++ rare&with snapshot (재실험; fast) | |
| Line Coverage(%) | 15.7 (15.8) | 15.7 (15.8) |
| Function Coverage(%) | 30.5 (30.5) | 30.5 (30.5) |
| Branch Coverage(%) | 12.1 (12.4) | 12.1 (12.4) |
2, 3의 가설이 틀렸다고 결과가 나왔다.
실험실패 원인 분석
- 실험을 24시간동안 돌렸기 때문에 실험 결과로 생성된 파일이 부족했을 수 있다.
- seed파일의 크기가 너무 작기 때문일 수도 있다.
재실험
AFL++에서 power schedule을 rare가 아닌 fast(default)로 실험해본다.
2. mutator
AFL++
export AFL_NO_SNAPSHOT=1
timeout 24h ./afl-fuzz -D -L -1 -i ../../common/input/ -o fast_D_L_output -- ../../binutils/binutils_afl_gcc/build/bin/objdump -x @@

3. forkserver vs. snapshot
(1) AFL++
export AFL_NO_SNAPSHOT=1
timeout 24h ./afl-fuzz -D -i ../../common/input/ -o fast_D_output -- ../../binutils/binutils_afl_gcc/build/bin/objdump -x @@

(2) AFL++
unset AFL_NO_SNAPSHOT
timeout 24h ./afl-fuzz -D -i ../../common/input/ -o fast_D_withsnap_output -- ../../binutils/binutils_afl_gcc/build/bin/objdump -x @@

재실험 결과
실험 3의 결과가 가설과 다르게 나왔다. forkserver를 사용하려면 AFL++에서 AFL_NO_SNAPSHOT으로 환경변수 세팅을 해야하는데, 코드상으로 확인은 했지만 확실히 forkserver를 사용하는지 판단하는 것은 찾지 못했다.
때문에 forkserver를 사용하지 않아서 실험 결과가 저렇게 나왔을 가능성이 있다.
Todo
forkserver, snapshot 중 어느것을 사용하고 있는지 확실히 판단할 수 있는 법 찾기
부록
결과 화면 참고 사항
https://afl-1.readthedocs.io/en/latest/user_guide.html#understanding-the-status-screen
AFL User Guide — AFL 2.53b documentation
1) Introduction Every copy of afl-fuzz will take up one CPU core. This means that on an n-core system, you can almost always run around n concurrent fuzzing jobs with virtually no performance hit (you can use the afl-gotcpu tool to make sure). In fact, if
afl-1.readthedocs.io
Overall results
- 지금까지 완료된 queue pass의 수 - 즉, 퍼저가 지금까지 발견된 모든 interesting test case를 살펴보고, 퍼징하고 맨 처음으로 되돌아간 횟수
- 모든 fuzzing session은 최소 1 cycle은 완료해야한다.
- 첫 번째 pass는 하루 이상 걸릴 수 있다.
- 넓고 얕은 coverage를 얻고싶다면 -d 옵션을 줘라 -> skip deterministic fuzzing step -> 하지만 standard mode에서보다 약간 떨어진다.
Map coverage
- fuzzer가 current queue cycle과 얼마나 멀리 떨어져있는지 알려준다.
- now processing > 현재 진행중인 testcase의 ID
- paths timed out > timeout되어 ditch하기로 결정한 input의 수
Path geometry
- 첫 번째 필드: guided fuzzing process를 통해 도달한 path depth를 추적한다.
- level 1 : user에 의해 공급된 첫 testcase
- level 2 : traditional fuzzing을 통해 얻을 수 있는 test case
- level 3 : 이들을 다음 fuzzing round에 대한 input으로 사용함으로써 얻은 것
그 외
- Mmopt: 새로 발견된 경로를 더 깊이 탐색하는데 도움이 되도록 새로운 seed의 점수를 높인다.
- Rare: seed의 runtime을 무시하고 다른 seed에 비해 거의 적용되지 않는 edge가 있는 seed에 초점을 둔다.
'정보보안 > fuzzing' 카테고리의 다른 글
| gcov, lcov 개념 및 사용하기 (0) | 2022.01.26 |
|---|---|
| 기본적인 fuzz testing algorithm 이해하기 + AFLFast (0) | 2022.01.24 |
| [최종 정리] AFL의 특징과 AFL++의 개선방안 (0) | 2022.01.13 |
| [논문 정리] Steelix: Program-State Based Binary Fuzzing (0) | 2022.01.11 |
| [논문 정리] AFL++: Combining Incremental Steps of Fuzzing Research (0) | 2022.01.10 |


댓글